
Motorhome Cleaning- complete guide
Posted on 13th October 2022
Summer is a great time to take your family on a road trip in your motorhome. However, before you can hit the open road, you need to clean it inside and out. This complete guide will walk you through the entire process, step-by-step. So pull out your supplies and get started!
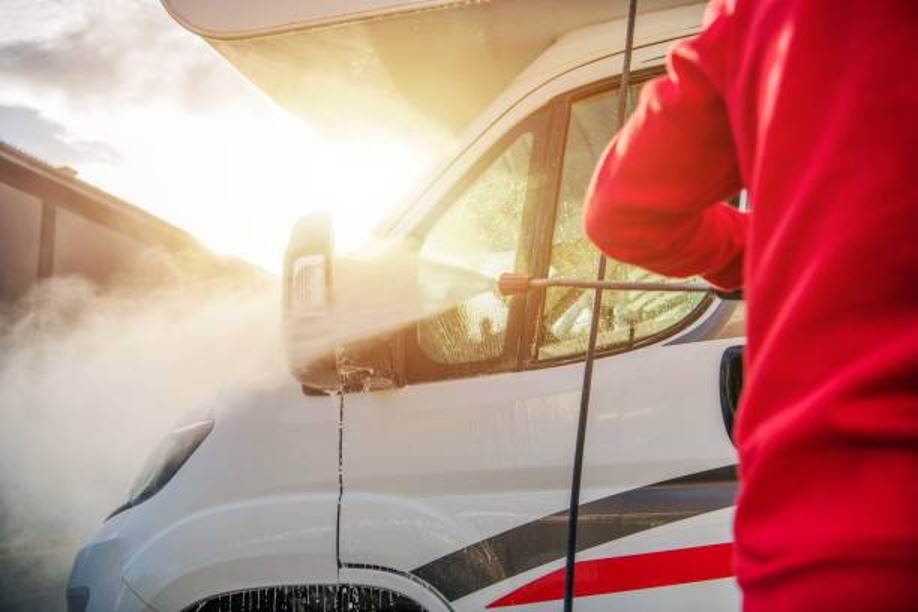
Clean The Motorhome Exterior
Spring cleaning isn't just for the inside of your home - your motorhome needs some love too! Here are a few tips on how to get a valeting service for your Motorhome:
Start with a rinse
Use a hose to remove any big pieces of dirt or debris from your motorhome's exterior.
Wash with soap and water
Mix some gentle soap with water and use a soft cloth or brush to scrub away any remaining dirt and grime. Don't forget to wash the wheels and tires!
Rinse again
Once you've washed the entire exterior, give it one final rinse with the hose to remove all the soap suds.
Dry everything off
Use a clean towel or chamois to dry off the motorhome's exterior, including the windows, mirrors, and lights.
Wax for protection
A good coat of wax will help to protect your motorhome's paint job and make it easier to keep clean in the future.
With just a little time and effort, you can have your motorhome looking as good as new - perfect for hitting the open road this summer!
Clean the Motorhome windows
One of the most important maintenance tasks for a motorhome owner is keeping the windows clean. Not only does this ensure clear visibility while driving, but it also helps to protect the interior from harmful UV rays. There are a few different methods that can be used to clean motorhome windows, but the best approach will vary depending on the type of window and the level of dirt and grime.
For example, if the windows are only lightly soiled, a simple solution of soap and water may be all that is needed. For more stubborn dirt and grime, a vinegar-based cleaner can be used. If the windows are very dirty, it may be necessary to use a power washer. Whichever method you choose, be sure to exercise caution to avoid damaging the glass or surrounding trim. With a little care and attention, you can keep your motorhome’s windows looking like new for years to come.

Vacuum the Motorhome interior
When it comes to keeping a motorhome clean, one of the most important tasks is vacuuming the interior. Not only does this help to remove dirt and dust, but it also helps to prevent the build-up of grime and stains. The best way to vacuum the motorhome interior is to use a handheld vacuum with a crevice attachment. First, remove any loose dirt and debris with a brush or dustpan. Below are some simple steps for vacuuming the interior of a motorhome:
Remove The Items
Start by removing all loose items from the floor and surfaces. This includes cushions, blankets, toys, and clothing.
Vacuum The Motorhome Floor
Next, vacuum all of the floors, working in small sections. Be sure to move furnishings as needed to reach all areas.
Vacuum The Motorhome Upholstered Areas
Once the floors are done, vacuum all upholstered surfaces, such as couches, chairs, and bench seats. Again, be sure to move furnishings as needed to reach all areas. Finally, vacuum any tight spaces or crevices, such as under the dashboard or between the cushions.
Unless you want to be constantly sweeping and dusting, it's important to vacuum your motorhome regularly. Not only will this help to keep the interior looking clean, but it will also help to prolong the life of the motorhome by preventing dirt and dust from damaging the surfaces.
Wipe down all of the Motorhome surfaces
As any RVer knows, one of the most important part of the packing process is to make sure that all surfaces are clean before hitting the road. This means giving the counters a good wipe down, sweeping out any dirt and cobwebs, and making sure that there is no food or crumbs lurking in corners. However, it is also important to know how to clean and sanitize the motorhome itself before setting off on a trip. This means taking a few minutes to wipe down all of the surfaces, including the dash, steering wheel, and gear shift. In addition, it is also a good idea to clean the windows, both inside and out. By taking a few minutes to clean the motorhome before setting off, you can help to ensure that your RV will be a comfortable and welcoming place to return to at the end of a long day of exploring.

Check for any Motorhome damage or wear and tear and repair as necessary
After a long journey, the last thing you want to do is discover that your motorhome has suffered some damage. Even the well-maintained vehicles can succumb to wear and tear, so it's important to check for any signs of damage before setting up camp. Look for any dents, scratches, or leaks, and if you find any, be sure to repair them as soon as possible. By conducting a comprehensive motorhome maintenance, you can help to ensure that it will provide years of trouble-free camping.
Before hitting the open road in your motorhome, it's important to give it a thorough inspection to make sure everything is in working order. This includes checking the tires, engine, suspension, and brakes. It's also a good idea to inspect the roof and windows for any leaks or cracks. If you're not mechanically inclined, it's best to take your motorhome to a qualified technician for a pre-trip inspection. By taking the time to do a thorough check before setting out on your journey, you can help ensure that your trip is safe and enjoyable.
In Conclusion:
The motorhome is looking pretty good now that we’ve given it a good clean! But before we hit the road again, there are a few more things we need to take care of. We should check for any damage or wear and tear and repair as necessary, then we can be on our way. Have you ever had to do any repairs on your RV?
Contact us to book your professional valeting service 01530 485554 • www.arnchem.co.uk
Tagged as: Motorhome Cleaning
Share this post: